Image segmentation is a fundamental process in computer vision and medical imaging that involves partitioning an image into multiple segments or regions to simplify its representation and make it more meaningful and easier to analyze. With segmentation, you can divide an image into distinct parts that represent different objects or areas of interest within the image. These segments represent different structures, objects or regions with similar properties.
This tutorial shows you how to load your volume into the Segment Editor Module of 3D Slicer and create multiple segmentation. The tutorial also provides you with the option to automatically segment a region using a built-in library called “HD Brain Extraction Tool”.
Let’s begin!
Overview
- Load volume into the Segment Editor Module
- Manually Annotating Region of Interest (RoI)
- Semi-Automatic Segmentation Based on Thresholding
- Automatic Segmentation to create segmentation from scratch
1 – Load Volume into 3D Slicer
You can import your 3D image volume into the 3D Slicer tool in different formats including Nrrd, NifTI, DICOM, and so on.
The third tutorial of this series will help you to download and input different 3D image volume formats into the 3D Slicer.
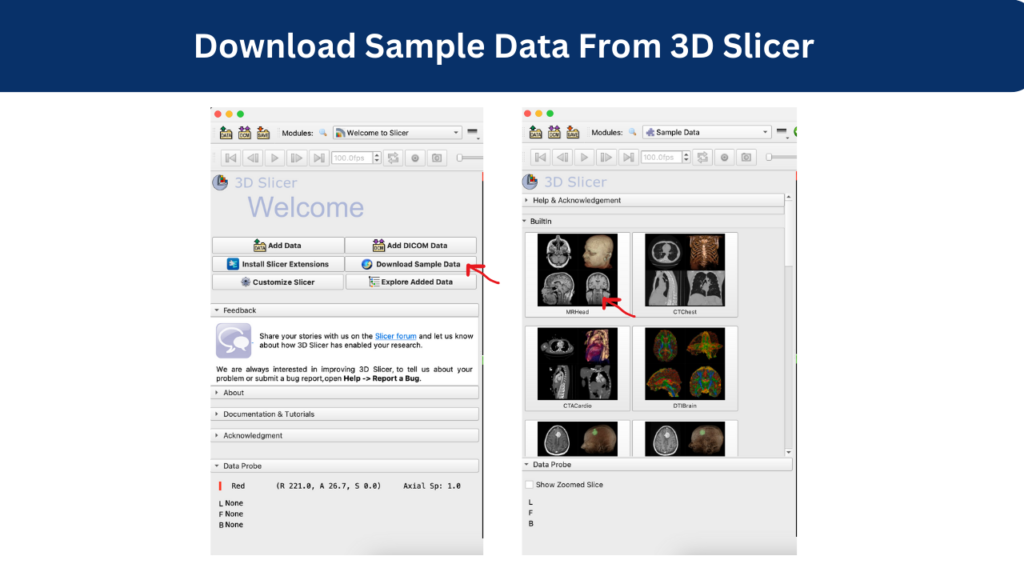
Or, you can use the sample data provided by the tool to get started! For this, you need to simply click on the Download Sample Data button in the 3D Slicer welcome window or go to Files –> Download Sample Data and select the data you would like to work with!
2 – Create Segments Using Segmentation Module
The first step after downloading the sample or importing your data is to create segments that you need to work with.
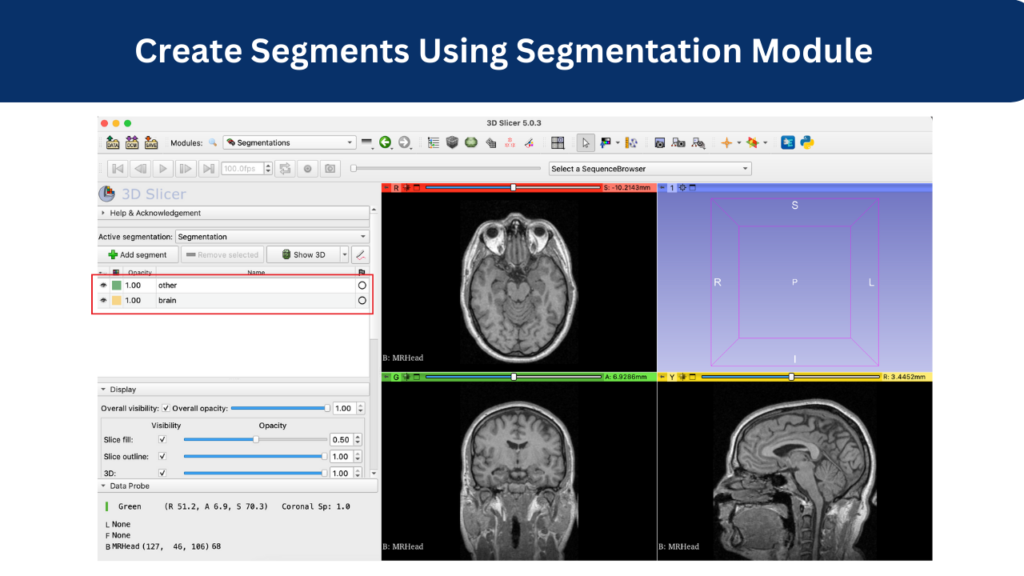
For this, go to the Segmentation module and click on “Add” button to add required segments.
For this tutorial, we have taken raw head MRI of patient. The MRI contains artifacts like eyes, back of the neck area, nose, shoulders, etc. We want to segment out the brain region from the artifacts.
We will create two segments, where “other” is for artifacts and “brain” is to segment out the brain region. You can create as many segments you need depending upon your segmentation problem!
3 – Manual Segmentation Using Segment Editor Module
Once the volume is loaded, navigate to the Segment Editor module in 3D Slicer. You can find it in the modules drop-down menu or by searching it using the search bar on the left of the drop-down menu bar.
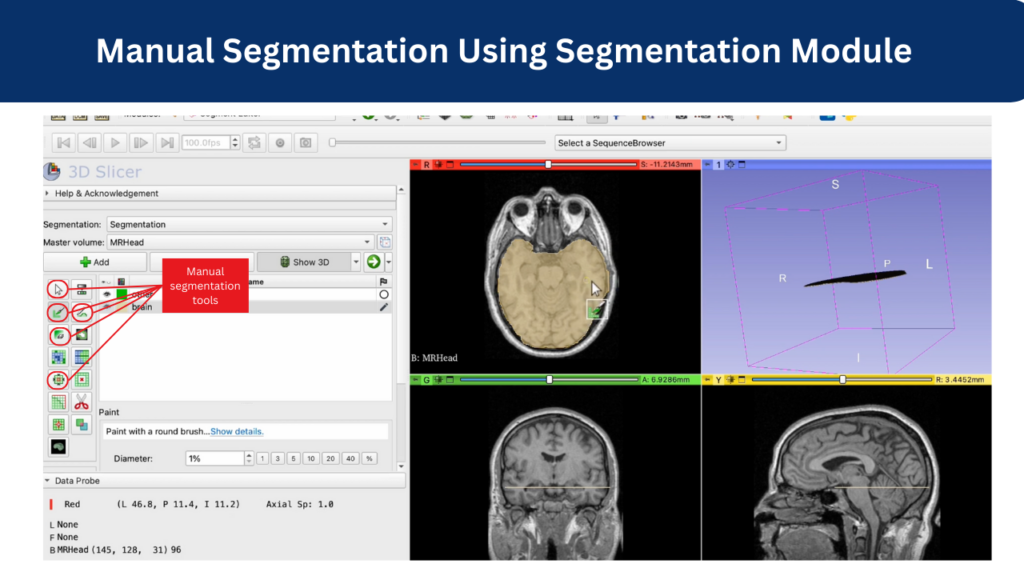
In the Segment Editor module, click on the “Add” button to vreate a new segment. Give the segment a name to identify the region you’ll be segmenting. You can also change the color of the segmentation as shown in the demonstration video.
Choose the “Paint” tool from the toolbar, adjust the brush size and opacity as needed for your segmentation task.
You can outline the region of Interest (RoI) in the volume using paintbrush tool. You can simply click and drag the mouse to paint over the areas you want to include in the segment.
This process is time-consuming especially when you’re wroking with complex structures or boundaries.
Also, you can use additional tools to refine your segmentation. For example, you can use the “Smoothing” tool to remove irregulaties or “Grow from Seeds” tool to expand segmentattions based on seed points.
Once you’re done with the segmentation, you should review the segmented regions in different angles (axial, coronal, sagittal) to ensure accuracy. Finally, you can save the segmented volume and and it is ready to use in other software or applications of your choice!
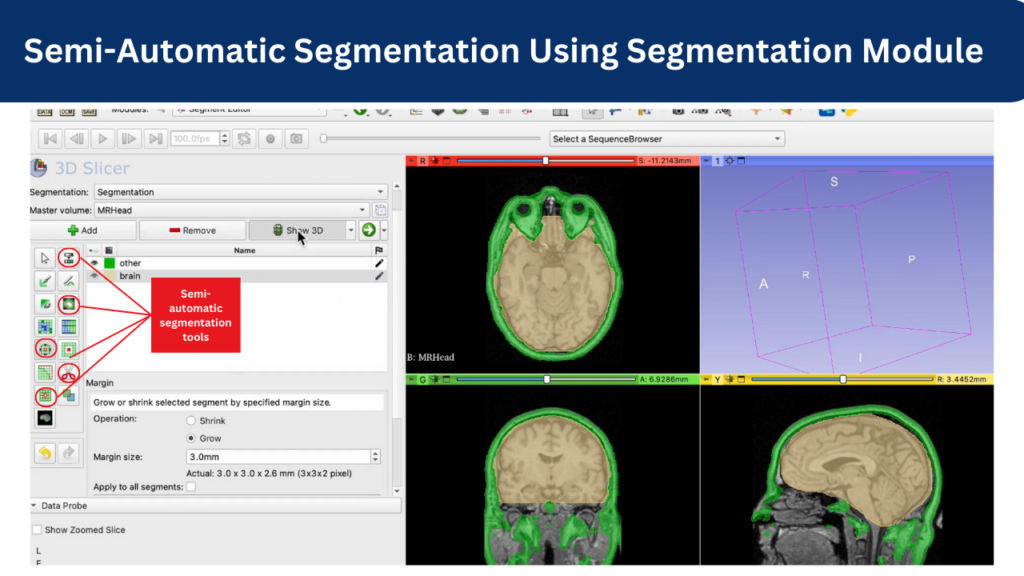
3 – Semi-Automatic Segmentation Using Thresholding
Semi-automatic segmentation streamlines the segmentation process by automating certain steps while still allowing for manual intervention and refinement. This significantly reduces time and effort compared to manual segmentation.
With this type of segmentation, you can ensure accurate delineation of region of interests, which is helpful in scenarios with complex and ambiguous anatomical structures.
You can apply this technique to various types of medical image data, including CT scans, MRI images, and more. Here’s how you can use the semi-automatic segmentation method in 3D slicer:
- Once you have loaded the 3D image data, open segment editor.
- You can choose from different semi-automatic segmentation tools such as thresholding, margin and grow, scissors to get the desired regions as shown in the demo video.
With the help of this method, you can segment out different regions including artifacts, tumors, body parts, and so on.
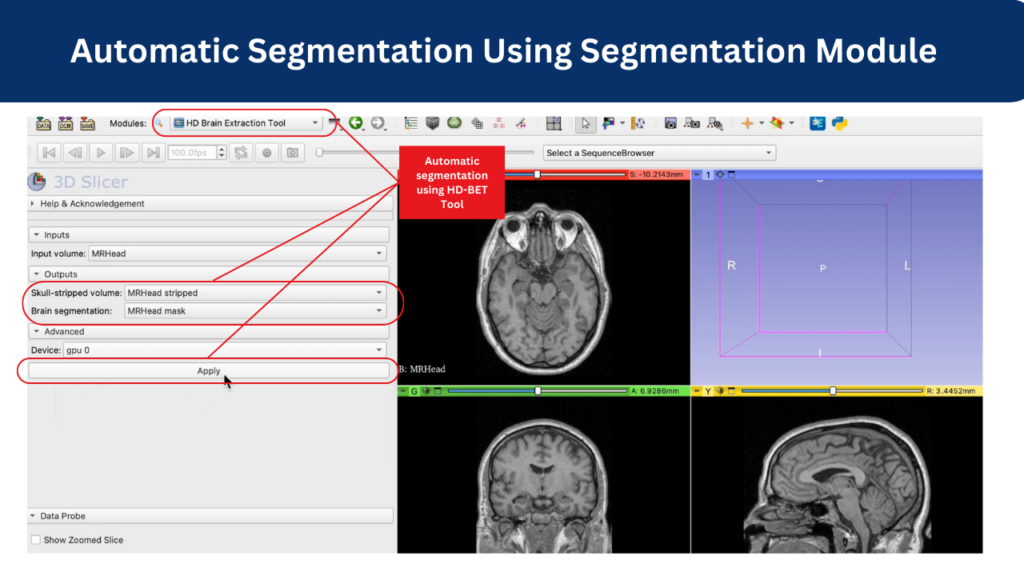
4 – Automatic Segmentation Using HD Brain Extraction Tool
Another super useful tool provided by the 3D Slicer tool is automatic segmentation. Firstly, it reduces time and effort required for image analysis by automating segmentation process. This becomes handy in scenarios where you have large datasets.
This option also ensures consistency and reproducibility in segmentation results and ensures unifromity in analysis procedures.
To use automatic segmentation effectively, you can follow these steps as shown in the demo video:
- Firstly, install the HD-BET extension for brain segmentation and make sure it is up-to-date. You might also have to install some additional libraries such as pytorch. The tool with guide you to install all the required extensions so you don’t have to worry about it!
- After loading the data, navigate to the automatic segmentation tool by going through the drop-down menu or by simply using the search option on the left of the drop-down menu.
- You can also adjust parameters such as threshold levels, seed points, or refinement settings. These parameters can affect the accuracy and quality of the segmentation results.
- Once satisfied, you can initiate the segmentation process, This may take some time depending on the system you’re using and the size of the input image. It may take up to a minute or two to process a 3D image.
- Once the process is complete, you can review the segmentation results to ensure accuracy and completeness.
- You can further refine the segmentation results if needed using the manual segmentation tools if you need to.
- Once satisfied with the results, you can save the segmented regions for further analysis or visualization.
By following these steps, you can effectively use automatic segmentation tools to extract useful information from medical images and facilitate advanced analysis and research.
Up Next: Co-registration Using 3D Slicer
In the next tutorial, we will explore how we can align images for advanced analysis and visualization using co-registration!

